Tuesday 31 May 2016

 HOW TO BOOST YOUR INTERNET WITH GOOGLE DNS

Configure your network settings to use Google Public DNS

When you use Google Public DNS, you are changing your DNS "switchboard" operator from your ISP to Google Public DNS.
In most cases, the IP addresses used by your ISP's domain name servers are automatically set by your ISP via the Dynamic Host Configuration Protocol (DHCP). To use Google Public DNS, you need to explicitly change the DNS settings in your operating system or device to use the Google Public DNS IP addresses. The procedure for changing your DNS settings varies according to operating system and version (Windows, Mac or Linux) or the device (computer, phone, or router). We give general procedures here that might not apply for your OS or device; please consult your vendor documentation for authoritative information.

Important: Before you start

Before you change your DNS settings to use Google Public DNS, be sure to write down the current server addresses or settings on a piece of paper. It is very important that you keep these numbers for backup purposes, in case you need to revert to them at any time.
We also recommend that you print this page, in the event that you encounter a problem and need to refer to these instructions.

Google Public DNS IP addresses

The Google Public DNS IP addresses (IPv4) are as follows:
  • 8.8.8.8
  • 8.8.4.4
The Google Public DNS IPv6 addresses are as follows:
  • 2001:4860:4860::8888
  • 2001:4860:4860::8844
You can use either address as your primary or secondary DNS server. You can specify both addresses, but do not specify the same address as both primary and secondary.
You can configure Google Public DNS addresses for either IPv4 or IPv6 connections, or both. For IPv6-only networks with a NAT64 gateway using the 64:ff9b::/96 prefix, you can use Google Public DNS64 instead of Google Public DNS IPv6 addresses, providing connectivity to IPv4-only services without any other configuration.
Some devices use separate fields for all eight parts of IPv6 addresses and cannot accept the :: IPv6 abbreviation syntax. For such fields enter:
  • 2001:4860:4860:0:0:0:0:8888
  • 2001:4860:4860:0:0:0:0:8844
Expand the 0 entries to 0000 if four hex digits are required.

Change your DNS servers settings

Because the instructions differ between different versions/releases of each operating system, we only give one version as an example. If you need specific instructions for your operating system/version, please consult your vendor's documentation. You may also find answers on our user group.
Many systems allow you to specify multiple DNS servers, to be contacted in a priority order. In the following instructions, we provide steps to specify only the Google Public DNS servers as the primary and secondary servers, to ensure that your setup will correctly use Google Public DNS in all cases.

Windows

DNS settings are specified in the TCP/IP Properties window for the selected network connection.
Example: Changing DNS server settings on Windows 7
  1. Go to the Control Panel.
  2. Click Network and Internet > Network and Sharing Center > Change adapter settings.
  3. Select the connection for which you want to configure Google Public DNS. For example:
    • To change the settings for an Ethernet connection, right-click Local Area Connection > Properties.
    • To change the settings for a wireless connection, right-click Wireless Network Connection > Properties.
    If you are prompted for an administrator password or confirmation, type the password or provide confirmation.
  4. Select the Networking tab. Under This connection uses the following items, select Internet Protocol Version 4 (TCP/IPv4) or Internet Protocol Version 6 (TCP/IPv6) and then click Properties.
  5. Click Advanced and select the DNS tab. If there are any DNS server IP addresses listed there, write them down for future reference, and remove them from this window.
  6. Click OK.
  7. Select Use the following DNS server addresses. If there are any IP addresses listed in the Preferred DNS server or Alternate DNS server, write them down for future reference.
  8. Replace those addresses with the IP addresses of the Google DNS servers:
    • For IPv4: 8.8.8.8 and/or 8.8.4.4.
    • For IPv6: 2001:4860:4860::8888 and/or 2001:4860:4860::8844.
    • For IPv6-only: you can use Google Public DNS64 instead of the IPv6 addresses in the previous point.
  9. Restart the connection you selected in step 3.
  10. Test that your setup is working correctly; see Test your new settings below.
  11. Repeat the procedure for additional network connections you want to change.

Mac OS

DNS settings are specified in the Network window.
Example: Changing DNS server settings on Mac OS 10.5
  1. Click Apple > System Preferences > Network.
  2. If the lock icon in the lower left-hand corner of the window is locked, click the icon to make changes, and when prompted to authenticate, enter your password.
  3. Select the connection for which you want to configure Google Public DNS. For example:
    • To change the settings for an Ethernet connection, select Built-In Ethernet, and click Advanced.
    • To change the settings for a wireless connection, select Airport, and click Advanced.
  4. Select the DNS tab.
  5. Click + to replace any listed addresses with, or add, the Google IP addresses at the top of the list:
    • For IPv4: 8.8.8.8 and/or 8.8.4.4.
    • For IPv6: 2001:4860:4860::8888 and/or 2001:4860:4860::8844.
    • For IPv6-only: you can use Google Public DNS64 instead of the IPv6 addresses in the previous point.
  6. Click Apply > OK.
  7. Test that your setup is working correctly; see Test your new settings below.
  8. Repeat the procedure for additional network connections you want to change.

Linux

In most modern Linux distributions, DNS settings are configured through Network Manager.
Example: Changing DNS server settings on Ubuntu
  1. Click System > Preferences > Network Connections.
  2. Select the connection for which you want to configure Google Public DNS. For example:
    • To change the settings for an Ethernet connection, select the Wired tab, then select your network interface in the list. It is usually called eth0.
    • To change the settings for a wireless connection, select the Wireless tab, then select the appropriate wireless network.
  3. Click Edit, and in the window that appears, select the IPv4 Settings or IPv6 Settings tab.
  4. If the selected method is Automatic (DHCP), open the dropdown and select Automatic (DHCP) addresses only instead. If the method is set to something else, do not change it.
  5. In the DNS servers field, enter the Google Public DNS IP addresses, separated by a comma:
    • For IPv4: 8.8.8.8 and/or 8.8.4.4.
    • For IPv6: 2001:4860:4860::8888 and/or 2001:4860:4860::8844.
    • For IPv6-only: you can use Google Public DNS64 instead of the IPv6 addresses in the previous point.
  6. Click Apply to save the change. If you are prompted for a password or confirmation, type the password or provide confirmation.
  7. Test that your setup is working correctly; see Test your new settings below.
  8. Repeat the procedure for additional network connections you want to change.
If your distribution doesn't use Network Manager, your DNS settings are specified in /etc/resolv.conf.
Example: Changing DNS server settings on a Debian server
  1. Edit /etc/resolv.conf:
    sudo vi /etc/resolv.conf
  2. If any nameserver lines appear, write down the IP addresses for future reference.
  3. Replace the nameserver lines with, or add, the following lines:
    For IPv4:
    nameserver 8.8.8.8
    nameserver 8.8.4.4
    
    For IPv6:
    nameserver 2001:4860:4860::8888
    nameserver 2001:4860:4860::8844
    
    For IPv6-only, you can use Google Public DNS64 instead of the above IPv6 addresses.
  4. Save and exit.
  5. Restart any Internet clients you are using.
  6. Test that your setup is working correctly; see Test your new settings below.
Additionally, if you are using DHCP client software that overwrites the settings in /etc/resolv.conf, you will need to set up the client accordingly by editing the client's configuration file.
Example: Configuring DHCP client sofware on a Debian server
  1. Back up /etc/resolv.conf:
    sudo cp /etc/resolv.conf /etc/resolv.conf.auto
    
  2. Edit /etc/dhcp3/dhclient.conf:
    sudo vi /etc/dhcp3/dhclient.conf
  3. If there is a line containing domain-name-servers, write down the IP addresses for future reference.
  4. Replace that line with, or add, the following line:
    For IPv4:
    prepend domain-name-servers 8.8.8.8, 8.8.4.4;
    
    For IPv6:
    prepend domain-name-servers 2001:4860:4860::8888, 2001:4860:4860::8844;
    
    For IPv6-only, you can use Google Public DNS64 instead of the above IPv6 addresses.
  5. Save and exit.
  6. Restart any Internet clients you are using.
  7. Test that your setup is working correctly; see Test your new settings below.

Routers

Every router uses a different user interface for configuring DNS server settings; we provide only a generic procedure below. For more information, please consult your router documentation.
To change your settings on a router:
  1. In your browser, enter the IP address to access the router's administration console.
  2. When prompted, enter the password to access network settings.
  3. Find the screen in which DNS server settings are specified.
  4. If there are IP addresses specified in the fields for the primary and seconday DNS servers, write them down for future reference.
  5. Replace those addresses with the Google IP addresses:
    • For IPv4: 8.8.8.8 and/or 8.8.4.4.
    • For IPv6: 2001:4860:4860::8888 and/or 2001:4860:4860::8844.
    • For IPv6-only: you can use Google Public DNS64 instead of the IPv6 addresses in the previous point.
  6. Save and exit.
  7. Restart your browser.
  8. Test that your setup is working correctly; see Test your new settings below.
Some routers use separate fields for all eight parts of IPv6 addresses and cannot accept the :: IPv6 abbreviation syntax. For such fields enter:
  • 2001:4860:4860:0:0:0:0:8888
  • 2001:4860:4860:0:0:0:0:8844
Expand the 0 entries to 0000 if four hex digits are required.

Mobile or other devices

DNS servers are typically specified under advanced Wi-Fi settings. However, as every mobile device uses a different user interface for configuring DNS server settings, we provide only a generic procedure below. For more information, please consult your mobile provider's documentation.
To change your settings on a mobile device:
  1. Go to the screen in which Wi-Fi settings are specified.
  2. Find the screen in which DNS server settings are specified.
  3. If there are IP addresses specified in the fields for the primary and seconday DNS servers, write them down for future reference.
  4. Replace those addresses with the Google IP addresses:
    • For IPv4: 8.8.8.8 and/or 8.8.4.4.
    • For IPv6: 2001:4860:4860::8888 and/or 2001:4860:4860::8844.
    • For IPv6-only: you can use Google Public DNS64 instead of the IPv6 addresses in the previous point.
  5. Save and exit.
  6. Test that your setup is working correctly; see Test your new settings below.

Test your new settings

To test that the Google DNS resolver is working:
  1. From your browser, enter a hostname URL (such as http://www.google.com/). If it resolves correctly, bookmark the page, and try accessing the page from the bookmark.
    • If you are using Google Public DNS64 on an IPv6-only system, repeat the above test with an IPv4-only hostname URL (such as http://ipv4.google.com/).
    If all of these tests work, everything is working correctly. If not, go to step 2.
  2. From your browser, type in a fixed IP address. You can use http://216.218.228.119/ (which points to the website http://test-ipv6.com/) as the URL.1
    • If you are using Google Public DNS64 on an IPv6-only system, use http://[64:ff9b::d8da:e477]/ as the URL instead. If this test does not work, you do not have access to a NAT64 gateway at the reserved prefix 64:ff9b::/96 and cannot use Google Public DNS64.
    • If you are using an IPv6-only system without Google Public DNS64, use http://[2001:470:1:18::119]/ as the URL instead.
    If this works correctly, bookmark the page, and try accessing the page from the bookmark. If these tests work (but step 1 fails), then there is a problem with your DNS configuration; check the steps above to make sure you have configured everything correctly. If these tests do not work, go to step 3.
  3. Roll back the DNS changes you made and run the tests again. If the tests still do not work, then there is a problem with your network settings; contact your ISP or network administrator for assistance.
1 Google thanks Jason Fesler for granting permission to use these URLs for the purposes of testing web connectivity.
If you encounter any problems after setting Google Public DNS as your resolver, please run the diagnostic procedure.

Switch back to your old DNS settings

If you had not previously configured any customized DNS servers, to switch back to your old settings, in the window in which you specified the Google IP addresses, select the option to enable obtaining DNS server addresses automatically, and/or delete the Google IP addresses. This will revert your settings to using your ISP's default servers.
If you need to manually specify any addresses, use the procedures above to specify the old IP addresses.
If necessary, restart your system.
Monday 30 May 2016

WhatsApp users being lured into downloading WhatsApp Gold, an information stealing malware App


If you are one of the billions using the hugely popular cross-platform messaging App, WhatsApp, you may have received this message – Download WhatsApp Gold Exclusive Version for you. Unfortunately, if you have fallen prey to the lure, you may have infected smartphone with a information stealing malware.
WhatsApp users, mostly from India, Pakistan and Brazil are being tricked into downloading ‘WhatsApp Gold’, an apparently ‘exclusive’ version of the app which actually infects mobiles with malware.
WhatsApp Gold exclusive offer is being reported/tweeted by many users.
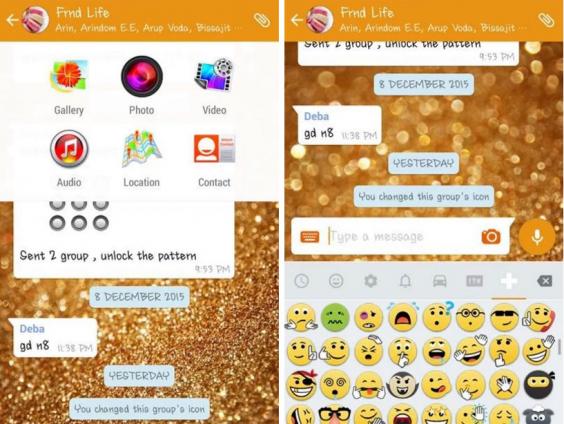
The scamsters have been spreading the malware by sending a very flowery message and download link from goldenversion.com. The message urges the current WhatsApp users to sign up for the service via the WhatsApp Gold website and avail extra features which are not available in the current app.
The app’s extra features (which the scammers claim have only previously been available to top celebrities) include the ability to send hundreds of pictures at once, new emojis, video calling,enhanced security features and more customisation options.

Do not fall prey to WhatsApp Gold

Remember, downloading this malware laden app will invite huge trouble. Downloading the WhatsApp Gold from the website will simply infect your phone with malware, possibly allowing cybercriminals to steal your data or track your movements and activity.
whatsappgold.jpg
Here is a sample of what the WhatsApp Gold version promises to be but isnt. It is a information stealing malware laden App.
Whats more, the original maker of the App, WhatsApp will ban you if it finds you have installed such an app on your smartphone.

Here are the top five tactics used by cyber criminals to steal your identity


One fine morning you may wake up to a reality called identity theft. While stealing someone’s identity is not legal, there are several tricky but legal methods scammers and hackers use which can expose you to identity theft as well. The first step to stop this worrying scenario is to be aware of the more common data collection schemes that can render you susceptible.
Provided below are the five tactics you should be aware of so you can keep your identity as well as saneness in check.

Social media spying

People have started sharing more about their personal lives over the internet than ever before with the emergence of social media. While you can virtually connect with long-lost friends and relatives through the social media, it also makes it simpler for a scammer or hacker to get hold of your personal information that could lead to identity theft. Generally, if you decide to reveal identifying information like your birthday or any other personal details, it is suggested that you keep your profile settings private and wisely contemplate the consequences of anything you post. For instance, bragging about your vacation could signal to a thief that personal information is being left unguarded at home or the mail is unattended.

Social engineering

Some scammers and hackers will create traps that depend mainly on human interaction to gain access instead of spending their time trying to guess or track down your personal information. This tactic is known as “social engineering.” They often portray themselves as a genuine person or company that is looking for information, social engineering tricks depend on people’s curiosity and trust to be successful. You may want to be cautious of “urgent” emails looking to confirm your login information or doubtful social media friend requests.

Tapping into your old hard drive or computer

Don’t just simply give away your old computer with the existing hard drive intact, if you are looking to sell or discard it. You could be unintentionally handing over the keys to information to the thieves that are needed to assume your identity. Ensure that the physical hard drive is replaced and destroyed before you throw out or upgrade an old machine.

Malware-based phishing

There are chances that you might be more vulnerable to scams masked as “fixes” to the problem when you feel that your computer has been taken over by malware. If you feel that your computer has been infected or has downloaded illegal content and if you are offered an instant solution to the problem, then think twice. You may actually end up installing the attacker’s malware instead.

Vishing, or “voice phishing”

Voice phishing or “vishing” scams are voicemails or robocalls that often pose as companies or government agencies with an unrelenting necessity meant to supersede your natural caution. They will want you to disclose important identifying information like your social security or credit card number quickly over the phone. Word of caution: a reliable organization will never function this way.

You Can Bypass Android’s Secured Lock Screen In These 7 Ways

To prevent unwanted access to your phone such as keeping strangers (or friends) from checking out your messages or private pictures, it always sensible to enable certain security measures. The most commonly used security measures in Android smartphones are the pattern lock, the personal identification number (PIN) or password.
But what happens if you forget the pattern, PIN, or password that locks your Android device? Don’t panic. Fortunately, Android provides several different methods to bypass the lock screen and get back in a locked Android smartphone or tablet. However, unfortunately, there’s not one method that works for all devices.
Given below are the most effective 7 methods that should hopefully get you back into your device.

Method 1: Use Android Device Manager (ADM)

A service called Android Device Manager is probably the best solution for newer Android smartphones and tablets. You can use any device or computer to access the service, as long as you are logged into your Google account, which is available available at this link.
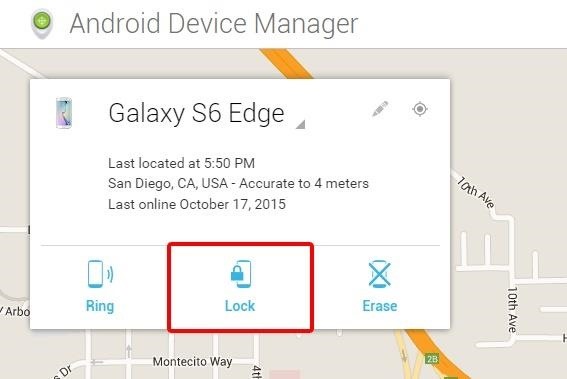
Once ADM gets a fix on your device, start by clicking the “Lock” button. If the service is having problems to locate your device, then click your browser’s refresh button a few times, and if your phone is compatible it should get connected within 5 attempts.

You will be prompted to enter a new password after you click the “Lock” button. This will replace the pattern, PIN, or password that you have forgotten. To confirm your selection, type the new password and then click the “Lock” button.

It may take up to 5 minutes for the password to change over from here. However, once it does, you should be able to enter the new password to unlock your device.

Method 2: Use Samsung’s ‘Find My Mobile’ Service

A similar service to ADM called Find My Mobile should be the first thing that you should try if you have a Samsung device. You can use any web browser to go to this link and log into your Samsung account. Unfortunately, this method will not work, if you have never set up a Samsung account. Also, you need to keep in mind that some carriers like Sprint, lock out this service.

Click the “Lock my screen” button in the left-hand pane once you have logged into your Samsung account. Enter a new PIN in the first field from here, and then click the “Lock” button near the bottom of the screen. Your lock screen password should be changed to the PIN you just entered within a minute or two that you can use to unlock your device.

Method 3: Use The ‘Forgot Pattern’ Feature

Try using the “Forgot Pattern” feature if your device is running Android 4.4 or lower. After 5 failed unlock attempts, you will see a message that says “Try again in 30 seconds.” Tap the button at the bottom of the screen that says “Forgot Pattern”, while this message is showing.

Select “Enter Google account details” (you may go directly to this option depending on your device), then enter your primary Gmail account and password.

Google will either send you an email with your unlock pattern, or you can change it right then and there.

Method 4: Perform A Factory Reset

Normally, a factory reset of the phone should work in almost any situation, if you are more worried about getting into your phone rather than saving any data stored on it.
Based on your device type, the process will differ. However, for most phones, you can start by switching the device completely off. Press and hold the volume down and power buttons at once when the screen goes black. This will prompt Android’s bootloader menu. Press the volume down button twice to highlight the “Recovery mode” option, and then press the power button to choose it.

Next, your phone should enter the recovery mode the moment you hold the power button down and tap the volume up button once. Then use the volume buttons to highlight the “Wipe data/factory reset” option, and press the power button to choose it.


Once the process is over, choose the “Reboot system now” option and you should no longer be locked out of your phone.

Method 5: Use ADB To Delete The Password File

If you have enabled USB debugging on your phone in the past, only then will this option work on your phone. Further, it will only work along with the aforementioned option only if you have allowed the computer you are using to connect via ADB. If you meet these requirements, then it’s a seamless way to unlock your device.
First, connect your phone to your computer with a USB data cable. Then, open a command prompt window in your ADB installation directory. Type the following command, and hit Enter.
• adb shell rm /data/system/gesture.key
Next, reboot your phone and the secure lock screen should be gone, letting you to access your phone. But note that this is only temporary. Therefore, before you reboot again, ensure that you have set a new pattern, PIN, or password for your phone.

Method 6: Boot InTo Safe Mode To Bypass Third-Party Lock Screen

Booting into safe mode is the simplest way to get around, if the lock screen you are trying to bypass is a third-party app rather than the stock lock screen.
You can boot into safe mode by bringing up the power menu from the lock screen for most of the phones, and then long-press the “Power off” option. When asked if you would like to boot into safe mode, select “OK” and when the process gets over, your third-party lock screen app will be temporarily disabled.
Next, just clear data on the third-party lock screen app or uninstall it, then reboot your phone to get back out of safe mode. The troublesome lock screen app should be gone when you get back up.

Method 7: Crash The Lock Screen UI

In the end, there is a way to get around the password lock screen, if your device is encrypted and running Android 5.0-5.1.1. This method will not work on any other type of secure lock screen, but it is a rescuer if you forgot your password.
First, hit the “Emergency Call” option on your lock screen, then enter 10 asterisks using the dialer interface. To highlight the entered text, double-tap the field and select “Copy,” then paste it into the same field to basically double the amount of entered characters. To add more characters, repeat the same process of copying and pasting until double-tapping the field no longer highlights the characters.
Next, return to the lock screen and open the camera shortcut. Pull down the notification shade and tap the Settings icon, then you will be prompted to enter a password. Long-press the input field and select “Paste,” then repeat this process numerous times. Finally, your lock screen will crash after you have pasted enough characters into the field, which will allow you to access the rest of your phone’s interface.
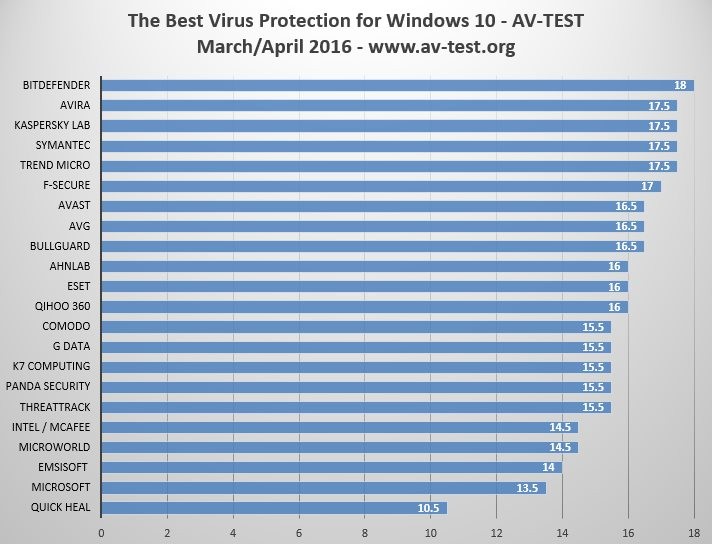
                                                  BEST ANTI VIRUS PROTECTION 2016
new-tests-reveal-the-best-antivirus-for-windows-10-home

Wednesday 25 May 2016

#Tutorial Can’t unlock your device, here are some simple steps to reset the passcode using the Google Account.

It is always advisable to have a passcode enabled on the Android device. Of the various reasons one is that it will help family, peers and unwanted acquaintances from snooping in your phone when left unattended and the other reason is to save your sensitive and personal data from being accessed by unknown people in case it gets into the hands of thieves in the scenario it gets stolen.
There are umpteen advantages of setting a passcode to the Android device however there is one major drawback in case if someone forgets their password because one cannot get through the phone until the passcode has been entered and here this article will come handy.
We will check the methods which will help you to get access to your locked Android device:
  • Erase the memory of the device: The most important requirement for this technique to give 100% result is that the Android Device Manager (ADM) must be enabled in the device.  If this device is not installed in your Android device please get this installed and enabled through this link.  Now you can follow these steps:
    • Visit the https://www.google.com/android/devicemanager site by using your computer or any other smartphone / tablet.
    • Sign in the Google login details, remember to use the same login ID that was used in the locked device.
    • You need to select the device that needs to be unlocked (most of the times it will be selected in the ADM interface, however if not then it needs to be selected).
    • Select “Lock”.
    • A window will appear, users will need to enter a temporary password in this window. Now press “Lock” again, here users will come across a recovery message which they can bypass and there is no need to enter this message.
    • Suppose, user has successfully managed to reset the password for their locked device, they will get a confirmation message below the box that has buttons (ring,lock,erase). Please be informed this method erases data like your apps, photos, and music.
    • Now, the locked Android device will show a password field, users will have to enter the temporary password that they created. This password will unlock the device.
    • Users will have to go to the Lock screen settings of their Android device and disable the temporary password.
  • Resetting the passcode with the Google Account: Now let us also check for an alternate method which normally is useful for the Android device with OS 4.4 and lower:
    • Here user will have to enter the wrong lock screen passcode or pattern 5 times, as it is since users have forgotten their passcode this will be easier.
    • Next, there will be “Forgot pattern” message on the screen of the locked device, user needs to touch this screen.
    • User would need to enter their Google account Username and password that they had previously added to their device and login.
    • Now users would need to reset the screen lock of their device. Check this link for more details.
  • Resetting the device to factory settings: If users cannot get through unlocking the device through the above two methods then they can use this third method. This method involves resetting the factory settings of the device, hence users need to be very careful when they do this as they need to take a backup of all their data as they might loose it. This can be done by using two methods:
    • Use settings menu to erase the data:
      1. User needs to Open the Settings menu of the device.
      2. Under “Personal,” touch Backup & reset. User may need to enter their pattern, PIN, or password.
      3. Under “Personal data,” touch Factory data reset > Reset phone or Reset tablet.
      4. If user’s have a screen lock, they will need to enter their pattern, PIN or password.
      5. When prompted, touch Erase everything to erase all data from the device’s internal storage.
      6. When user’s device has finished erasing, select the option to reboot the device.
      Once done, user needs to follow these steps check it on https://support.google.com/nexus/answer/2819582
    • The other method is Recovery mode wherein Google has laid out different steps for different brands and hence Nexus users need to check this link for details: https://support.google.com/nexus/answer/4596836.
    • Users other than Nexus can check the below link to carry out the factory settings: https://support.google.com/android/answer/3094742
Above given methods will definitely help users to unlock their Android device. If readers have some more methods with which one can unlock their locked Android device feel free to mention it in the comments.

THE 100 YEARS MOVIE YOU WILL      NEVER SEE

Robert Rodriguez and John Malkovich Have Made a Movie That Will Only Be Released Long After You’re Dead

100 years movie
Director Robert Rodriguez has always been game for experimentation and actor John Malkovich has never shied away from odd projects, but their new collaboration, titled 100 Years, is something else entirely. Although it’s technically a promotional stunt for Louis XIII Cognac, a luxury item that costs more than most human beings make in a month, this film can’t help but make a fascinating artistic statement by its very nature.
Because it won’t be released for a century. Seriously. 100 Years won’t be screened anywhere until 2115. Even the teasers that have been released don’t contain footage from the actual movie
All the descendants will have access to this movie when it is realised. The gimmick is that is takes 100 years to properly age Louis XIII into a bottle of booze that only millionaires can afford, so what happens when you let a top secret Rodriguez/Malkovich project sit around for a century?
Hit the jump a few teasers and some more information on the 100 Years movie.

Here’s the official statement on the project from Ludovic du Plessis, the global executive director of Louis XIII
Watch The teaser here

THE 100 YEARS MOVIE YOU WILL NEVER WATCH

Tuesday 24 May 2016

iobit malaware fighter serial for pro
971CC-7A3A2-F4D46-3F9A1
 Advanced system care 9 serials


E138C-690E1-C7C5D-1E384 | Valid till 16.Dec.2016
61D7E-06323-689F2-6FA84 | Valid till 23.May.2016

Sunday 22 May 2016

      THE WORLDS MOST DANGEROUS HACKERS OF ALL TIME
 1 Kevin Mitnick
Kevin Mitnick
We often watch movies showing hackers doing insane things on their computers, law enforcement agencies chasing them down and the news media covering every bit of it. Kevin Mitnick’s story is quite similar to any Hollywood Hacking Movie. At the time of his arrest, he was the most wanted person in relation to computer crimes.
His first brush with hacking came about when he learnt the concept of social engineering and learnt of a system to bypass the punch card system on the L.A. bus. At the age of 16, he hacked into various computer systems and copying softwars, an allegation for which he was charged 9 years later in 1988. Having made to serve twelve months in prison and three years of supervised release, Mitnick continued to hack into various systems for which fresh charges were framed against him. Mitnick fled and was on the run for more than two and a half years using cloned cell phones to hide his location. Mitnick was finally arrested in 1995 and sent to prison for 4 years in 1999.
Mitnick’s conviction gained a lot of media coverage and controversies. His prison term was in solitary confinement after the judge was convinced that Mitnick can start a nuclear war simply by whistling into a telephone system to activate NORAD’s codes. His conviction has also been blamed by over-exaggeration by the media on his capabilities and misinformation of what computers are capable of doing.
After release, Mitnick now runs an IT security company called Mitnick Security Consulting LLC that helps companies prevent hackers from infiltrating their system. He is also an advisory member and on the board for many IT and security companies

2       Gary McKinnon
Gary McKinnon
Gary McKinnon has been labeled by the media for carrying out the biggest computer hack of all time and being one of the most dangerous computer hackers in the world. He has been credited with carrying out the biggest and most dangerous attack on the U.S. military computer servers and deleting vital information, softwares, data and files over a period of 1 year whilst sitting in London. His actions have costed the U.S. government more $70,000 for undoing whatever McKinnon had done. His act had left thousands of computers inoperable for a period of 24 hours. McKinnon argues that he carried out this activity to uncover information that the U.S. government may be hiding from the general public like technology and the likelihood of extra-terrestrial life.
Investigation against McKinnon started in the year of 2002 with the U.S. government demanding an extradition. McKinnon and his lawyers have long countered the extradition to the U.S citing the possibility of inhumane conditions in America, health grounds and stating the lack of necessity to face trial in the U.S. The debate of whether or not McKinnon should be extradited to the U.S. is still raging in the British parliament with the likelihood of his trial taking place within the UK.
Recently he turns into a search expert 

Michael Demon Calce
Michael Demon Calce
Today internet security is extremely stringent and websites are extremely particular about the safety of their data and their customer information. Much of today’s stringent internet security is all due to an act that Michael Demon Calce demonstrated back in the year 2000. At the time, Yahoo! was the most popular website on the internet and was the most used search engine. Calce targeted the Yahoo! systems and shut down the service for more than an hour. He also went ahead and shut down ebay, Amazon, Dell, CNN and a host of other leading websites.
Calce was later arrested when he was found bragging about his achievements on an internet chat forum and revealed certain details that was not made public and nobody else would be aware of. Since he was a minor, the Canadian courts let him off lightly with eight months of open custody, one year of probation, a small fine and a limited access to the internet. Since the American economy took a big hit with Calce’s action, IT giants took note of the fact that an underage teenager can hack into their systems which eventually paved the way for modern security measures.
Later, Calce admitted that only the Yahoo! Infiltration was a planned one and the rest were carried out on ‘auto-pilot’ mode by the software that we was using when he left his laptop on when he left for school. Calce is today a journalist, author, consultant and speaker on the topics of internet security.

Kevin ‘Dark Dante’ Poulsen
Kevin Poulsen
Kevin Poulsen has two attributes that make him stand out from the rest of the hackers. He was the first American who was made to serve an internet and computer ban after being released from prison and was had gained a specialty in hacking only through telephone lines. He first gained attention when he hacked into an L.A. radio network so that he could be the 102nd caller and would win a new Porsche. He had also reactivated all old Yellow Page escort service phone numbers so that his friend could operate a virtual escort service. When his name once came up in a TV show called Unsolved Mysteries, the 1-800 numbers of the TV station mysteriously crashed.
After being released from Prison, Kevin decided to put away his past and instead became a journalist. He is currently the senior editor for Wired News and his most notable article is where he managed to obtain a list of sex offenders from MySpace. His article led to one arrest
 5 Adrian Lamo
Adrian Lamo
Many hackers do what they do to earn money and fame and are hence known as ‘Black Hat’ hackers where as those who do it to improve internet security and to prevent the Black Hats from entering are called ‘White Hat’ hackers. Adrian Lamo, on the other hand, has been known as a ‘Grey Hat’ hacker since he has done work for either side.
He first gained attention when he managed to hack into the systems of many high-profile companies such as Yahoo, Microsoft, The New York Times and many others. When Lamo was arrested for breaking into their systems unauthorized, he claimed that he has done these companies a favor by highlighting the loopholes in their system and has actually saved them a lot of money. Lamo serving a 6-month detention term and was made to paid $65,000 in fine for his acts.
In 2009, Lamo once again came in the news for his alleged role in Wikileaks and his role in helping donate sensitive material to the website. Lamo later uncovered the role of a U.S. Soldier PFC Bradley Manning who has been misusing his role to collect classified data and selling it to Wikileaks. Adrian has claimed he has done so because many lives were in danger since Manning was active on-duty when he did this. Lamo has ever since been keeping a low profile and fears for his life after the Manning episode.

Jonathan James
Jonathan James
Jonathan James has been credited with being the first juvenile to be incarcerated for cybercime in the United States. He was aged 16, when charged with hacking into the computer systems of the Defense Threat Reduction Agency, a division of the Department of Defense. He installed a backdoor into the DTRA server that allowed him access to all forms of communication in and out of the computer system and numerous usernames and passwords. He also hacked in the NASA systems and stole softwares that controlled essential life sustaining equipment on-board space ships.
James was later traced and arrested but since he was a minor, faced six months of house arrest, probation till he turned 18, made to apologise to all the departments that he hacked into and was banned from using a computer for recreational use.
In 2007, when the departmental store, TJX reported a hack into their computer system and a compromise of  sensitive customer information, the Secret Service include Jonthan’s name in the list of those believed to be a part of the act. Although no evidence was found against Jonathan, he was still not dropped from the list of suspects which led him to ultimately kill himself in 2008. His suicide is believed to be caused due to tall the mental pressure he was being made to undertake for a crime he believed he was never involved in
 7   Jeanson James Ancheta
Jeanson James Ancheta
Jeanson James Ancheta became the first person to be charged with controlling large numbers of hijacked computers or botnets. Botnets were often used by hackers for malicious activity but Ancheta upped the game when he publicized his achievement and advertised his collection of bots on various internet chat rooms. He put up prices that he would charge people for renting out the machines and how many bots would one require to take down a certain kind of website. He supposedly hijacked more than half a million computers using botnets.
Ancheta was arrested in 2005 after a sting operation and was sentenced to a 5 year prison term, made to forfeit his car, all his profit and made to pay a fine for all the damages he caused.
 8   Albert Gonzales
Albert Gonzalez
The only motive for Albert Gonzales was to make money, a lot of it and really fast. Gonzales started a group of hackers called as the Shadowcrew group. There were more than 4,000 members on the website who aided in trafficking 1.5 million credit, debit and ATM card numbers. The website taught it’s users on how to sell these cards, create fake documents and a host of other things they needed to know. Gonzales avoided a jail term by spilling the beans on the Shadowcrew group and providing information of all this associates.
From mid-2005 to the ending of 2007 Gonzales managed to hack into the computer systems of the TJX group of retailers servers and steal over 45 million card details. He and his crew were able to pull it off by using unsecured wi-fi connections along U.S. Route 1. Gonzales was finally arrested in 2008 and is currently serving a prison term, which is due to end in 2025.
Albert Gonzales was known for having a lavish lifestyle, staying for days in fancy hotel rooms and throwing a $75,000 birthday party.


  9  Mathew Bevan and Richard Pryce


In 1996 these two guys hacked into U.S. military systems and a Korean nuclear facility. At the time, however, officials weren’t sure if the duo were infiltrating a North or South Korean facility. Luckily it was the southern, for if it had been the northern, the hacking would have been considered an act of war.

 10 Owen Walker


When he was only 17 years old, this hacker led an international hacking group that cause around $26 million in damages. He created the “Akbot” virus, which spread to 1.3 million computers, causing them to crash. Ironically, and even after pleading guilty, this hacker was never convicted, as the judge decided the boy’s future would be harmed.


11  Astra


This hacker’s real name was never revealed, but he was a 55-year-old Greek mathematician who operated between 2002-2008. He stole weapons data and 3-D imaging technology from French company The Dassault Group, which he sold for $360 million to buyers around the world. Dassault went on a world-wide manhunt, tracking Astra to an apartment in Athens, Greece.


12    Robert Tappan Morris

Robert Tappan Morris
A computer scientist who in 1988 invented the first computer worm on the internet known as the Morris Worm. Robert Tappan Morris was the first person to have ever been convicted due to his violation of the Computer Fraud and Abuse Act of the United States. He used to be a professor at the Department of Electrical Engineering and Computer Science of the Massachusetts Institute of Technology before he was sentenced to three years of probation by the US court.


13  Kristina Svechinskaya

Kristina Svechinskaya
Kristina Vladimirovna Svechinskaya is a young Russian hacker who got involved in several plots to defraud some of the largest banks in the United States and Great Britain. She used a trojan horse to attack and open thousands of bank accounts in the Bank of America, through which she was able to skim around $3 billion in total

   14 Karl Koch

Karl Koch
A German hacker who became famous in the 1980’s, Karl Koch was involved in the sale of hacked information from US military computers to the KGB, the main security agency of the Soviet Union. He was a member of different hacking organizations such as the CCC (Chaos Computer Club), and worked with individual hackers such as DOB or Dirk-Otto-Brezinski and Urmel. He was among the few hackers who got involved in the Cold War computer espionage incident.


15 Ehud Tenenbaum

Ehud Tenenbaum
An Israeli cracker, Ehud Tenenbaum caught the attention of the media at the young age of 19, after he led a group of young hackers that damaged the computer networks of some of the largest institutions in the United States. Young as he was, he was arrested for hacking the computer systems of the US Air Force, NASA, US Navy, The Pentagon, Knesset and MIT. He also hacked into the computers of terrorist groups based in Palestine and destroyed the websites of Islamist organization Hamas.


16 Andrew Auernheimer

Andrew Auernheimer
More commonly known as “Weev,” Andrew Alan Escher Auernheimer was an internet troll who gained media attention because of his inflammatory, off-topic posts in several online communities and forums. An American grey hat hacker, Andrew was known for using several pseudonyms in his operations. He was the one responsible for the disruption of Amazon’s services in 2009 and for hacking New York Time’s website.


16   Rafael Nunez

Rafael Nunez
Rafael Nunez was a member of the notorious hacking group World of Hell in 2011. As a member of the group, he got involved in several high profile attacks, finding websites with poor security and then defacing them with light-hearted messages. He was part of the Dan Verton book entitled “The Hacker Diaries: Confessions of Teenage Hackers” in 2002. Today, he is a notorious businessman dwelling in Venezuela


17  Julian Paul Assange

Julian Paul Assange
An Australian editor and publicist, Julian Paul Assenge is the founder of WikiLeaks, a site that publishes submissions of secret information from personal web accounts and news leaks. Before he became internationally acclaimed for his founding of WikiLeaks, he was a teenage hacker who published US military documents. At age 16, he joined the International Subversives group and hacked computer systems under his pseudonym, “Mendax.


  18  Chad Davis

Chad Davis
An American hacker who operated under the pseudonym Mindphasr, Chad Davis is among the most notorious cybercriminals of the 20th century. He founded Global Hell, a syndicate of computer hackers in the United States, and authored the hacking of the websites of some of the largest organizations and corporations in the country. He was the man behind the vandalism of the homepage of The White House and the US Army with a message saying “GlobalHell will not die.”

 19  Raphael Gray

Raphael Gray
At age 19, Raphael Gray was able to hack several computer systems around the world in just a matter of one month. His mission was to gain unauthorized access to credit card information, which eventually netted him millions of dollars. Dubbed “The Bill Gates Hacker,” Gray broke into secure computer systems and published all the credit card information he accessed as part of his multimillion credit card pound mission.
20  Anonymous hacking group
Image result for anonymous computer hackersImage result for anonymous computer hackers
 Anonymous is a hacktivist group is composed of hackers from all of the world which is still active to date it became famous for hacking the west baptist church,us govermen websites,NASA,ISIS websites,US federal reserve ,Sony,paypal,Israeli websites and many others


Saturday 14 May 2016

Easy 3 step guide for newbies to learn hacking

Hacking is often one of the most misinterpreted words in computer lexicon. Hacking was a term that originated in 1990s and is associated with the unauthorized use of computer and network resources. By definition, hacking is the practice of altering the features of a system, to accomplish a goal which is not in scope of the purpose of its creation. However, hacking has more to it than just altering a code, it is a high paying career choice with huge reputation for successful hackers.
If you are a beginner and need to learn how to hack, the information provided in this post can surely help you out.

How can I Learn to Hack as a newbie?

If you are a beginner and have little or no knowledge of hacking, the best way to learn is to start from the basics rather than undertake complicated hacking assignment. It is always advisable to think and start small in hacking. Instead try to spend time in mastering the basic concepts of hacking so you can learn advanced hacking methods later.
To successfully learn how to hack, the following are some of the steps that you can take:

Step-1: Explore the Fundamentals

Know you computer, this is that basic thing you should start of with. You can start off by exploring the fundamental concepts such as operating system basics (Windows and Linux), computer networking, network protocols, firewalls and how each of these stuffs work etc. A little theoretical knowledge of the above is a must for you to progress as hacker.
You can make use of resources and websites on the Internet to source your knowledge. If you are more interested in exploring any of these stuffs in detail, you can always pick up a book that details the particular aspect of computing.

Step-2: Find a Good Source that will Teach How to Hack in Simple Steps

Hacking is a self learning exercise but you wont progress until you have a good master. Most of the times, the information available on the Internet is fragmented or too geeky. A good book or a teacher can lay down very short term goals for you. A book is always better to teach you how to hack in a step-by-step easy to follow manner. If you are a newbie, this book called Hacking Secrets Exposed  is a perfect source for learning how to hack.

Step-3: Learn Programming

If you really want to hack like an elite hacker, programming is something that you can’t skip. Even in programming there are several languages with ready made tools and programs to help you hack like the Kali Linux.
Iis always better to have some basic understanding of programming languages like HTML, PHP and JavsScript so that you will be in a better position to figure out how they work and what’s going on in the background. Nevertheless, there are hackers who are successful and they dont know how to program at all.

How Long does it Take to Learn Hacking?

Hacking is all about dedication and putting long hours. How long will it take for you to learn hacking is the answer you yourself will know once you proceed using the above three steps.
To remember, hacking requires knowledge, skills, creativity, dedication and of course the time. It also requires the nose to spot anything that is out of context. For your hack attempts to be successful, you should adopt a hacker’s mindset and start thinking just like the hacker.
To become a good hacker you need to know your goals. Finding flaws is most difficult if you start with multiple objectives. Learn to track a single goal till it is accomplished before you move on to the next one.